.png)
.png)


How to Teach Atomic Structure and Electronic Configuration remotely using Google Jamboard
- Androy Bruney

- Nov 28, 2021
- 7 min read
Updated: Dec 3, 2021
In this post, I explain how I sequence my teaching of the sub-microscopic concepts: atomic structure and electronic configuration during distance learning using interactive activities in Google Jamboard.

* This post is not sponsored by Google
What is Google Jamboard and why it is excellent for distance learning?
Google Jamboard app is a virtual whiteboard app developed by Google, which lets you collaborate with your students in real-time using a web browser, or touch screen device.
There are a host of virtual collaborative whiteboards out there that offer the same or even more interactivity, but a few of the reasons I have stuck with Jamboard for my virtual classes are:
1. It seamlessly integrates into the Google Universe.
Many educators are using apps from Google Workspace for distance learning. Because of its seamless integration, Google Jamboard can be easily accessed via Google Meet during live classes with students.
I simply upload my customized Google Jamboard activities from my Google Drive folder and change the permissions to allow my students to become editors so that we can work on an activity in real-time. Furthermore, I can easily assign Google Jamboard workbooks that I have created to my students via Google classroom for additional practice and homework.
2. It is easily customized and can be used to make chemistry sessions more interactive.
I can easily upload my custom-made backgrounds and insert moveable elements into the Jamboard making my lessons more student-centered and collaborative.
3. It has a user-friendly interface which is ideal for my younger and less tech-savvy students.
Students can download the app onto their mobile phones, tablets, or chrome books which allows them to easily write on the whiteboard using their fingers (if they do not own a stylus), and interact with draggable elements during our session, while I am simultaneously guiding them and offering support via Google Meet video chat.
Sequencing my Lesson for maximum engagement and understanding
My lesson on the atomic structure is sequenced in order to help students develop their understanding and to construct new knowledge on the foundation of their pre-requisite knowledge of matter. Each upper level (as shown below) is built upon the previous level.
This plan also allows me to assist students in making the necessary connections between the sub-microscopic and symbolic levels of representation which is essential for conceptual understanding in chemistry (Johnstone, 1991).

I typically use this lesson sequence for my one-to-one tutoring sessions, however, they can be easily modified for larger groups of students.
Now that we have that out of the way, here is how you can use Google Jamboard to teach Atomic Structure and Electronic Configuration.
Activity #1: Introducing The subatomic Particles
Prior to our sessions, I send students a few videos via Google classroom as prep for our classes. These videos provide the prerequisite knowledge such as:
what is an atom
what makes up an atom
properties of the subatomic particles which make up an atom.
The first activity in my lesson sequence is generally a way of checking that students have done the preparation and that they have sufficient foundational knowledge to proceed.
Students are first asked to define an atom:
A definition I favor is:

I like this definition because it makes reference to the subatomic particles which students are about to learn, therefore they are able to make the necessary mental connections.
Once I have satisfactory responses students are given a diagram to label.
The video below shows one such activity.
At this point, it is important to stress that models are only representations used by scientists to provide some explanation for the behavior and chemistry of submicroscopic entities and that atoms do not actually look like these diagrams/ models.
After the elements are in their correct positions we then discuss the properties of these subatomic particles. Such as relative mass and relative charge.

As discussion points students are asked:
which subatomic particle(s) is/are responsible for the mass of the atom
which subatomic particle(s) is/are responsible for the volume of an atom
Through discussion, I begin setting up for the next level in the sequence.
Activity #2: Understanding Chemical Notation
Students need to know the different elements of the periodic table, what is more, they should be able to extract information from the periodic table. This is why understanding chemical notations for the different elements is important.
In order to do so, students should be able to:
Define atomic number
Define mass number
Defining Atomic Number:
Students are told that the atomic number of an element is equal to the number of protons present in an atom of that element and I further explain that the atomic number is unique to a particular element, i.e. no two elements can have the same atomic number.
Students are then asked to fill out a table of subatomic particles and atomic numbers for a few elements given the atomic structures of these elements. In so doing students begin to integrate these concepts visually.

Alternatively, students can be given the atomic numbers of different elements, then asked to determine the numbers of each subatomic particle. Students can then independently determine the relationship between the atomic number to the number of protons.
Once the tables are filled, students are asked to look at the diagrams and the table and to determine the relationship between the atomic number and the number of electrons in an atom. They should come away with something like this:

Defining Mass Number:
I start off this section by asking students (again!) which subatomic particles contribute to the mass of an atom.
Having already covered the foundation, students will know that the answer is protons and neutrons (the nucleons), which make up the atomic core.
Using the same examples from before students are asked to determine the mass numbers of each of the elements presented. Once students have done this, I ask them to write down an equation that can be used for determining mass numbers if for example, we do not have images of atoms and we cannot count the particles directly.
This is a deliberate attempt to help students begin to connect the submicroscopic and representational levels.

Once that is done, students are given some practice finding mass numbers and atomic numbers as formative assessments.
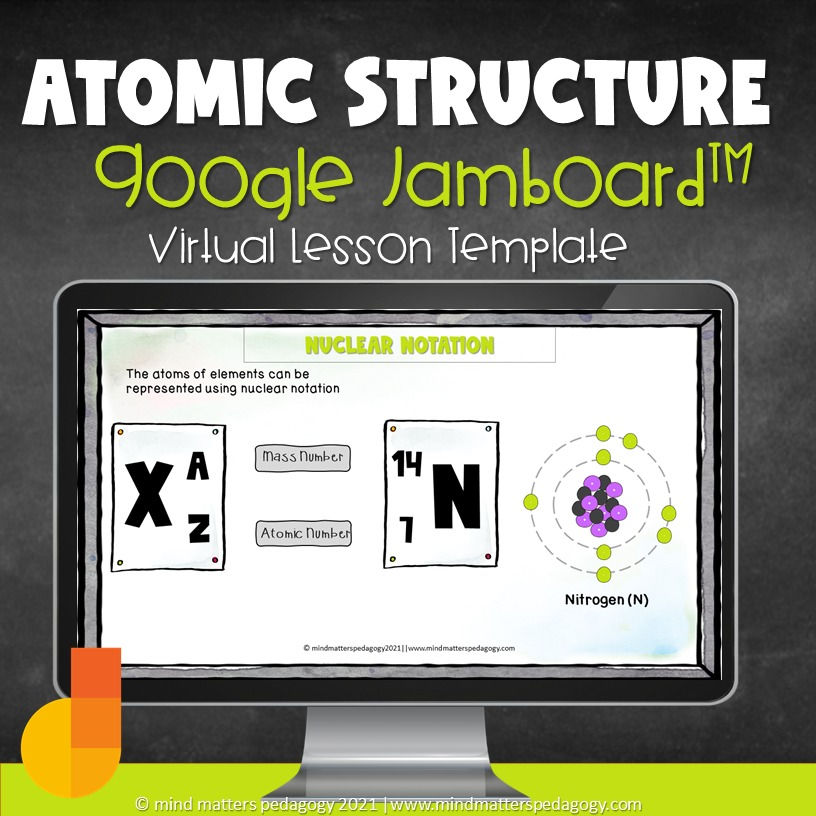
Activity #3: Writing Nuclear Notation

Students are given this general image for nuclear notation and told that this is another way of representing the elements (symbolic level of representation)
Connecting the submicroscopic with the symbolic level of representation
Students are given two activities to bridge the gap between the symbolic and sub-microscopic levels of representation.
For the first activity, students are given the number of subatomic particles and are asked to construct the nuclear notation for the element.

For the second activity, we focus on extracting information from the chemical notation. At this point, students have all the tools and knowledge necessary to do so.
Activity #4: The Electronic Structure and Electronic Configuration of an Atom
At this point, students have seen a number of examples of the electronic structures of different elements (without me actually using the term electronic structure) with all the models they have been working on within the previous activities.
We do a brief review of atomic structure then I explain the concept of energy levels.
I have stopped using the term electron shells in favor of energy levels (although it is not incorrect to use) only because some students tend to develop the misconception that there are physical shells present.
I reiterate that the energy levels, depicted by concentric circles represent the orbit of the electrons around the atomic core.

Students are then told that each shell can hold up to a certain number of electrons (By this point, some astute students would have already realized this due to the number of models/diagrams we have been using in our examples).
I then give students an image and show them how the nuclear notation (which they now have a grasp of) can be used to determine electronic configuration (the arrangement of electrons in energy levels).
We start off with a few simple elements to practice.
Students first calculate the numbers of protons, neutrons, and electrons present, secondly, they use the drag and drop elements to fill in the nucleons and finally they arrange the electrons in the different energy levels.
I emphasize that we add them singly first then we pair them off (a shout out to Hund's rule) which makes understanding of expanded electronic configuration using atomic orbitals easier for them later on.
The video below shows an interactive activity for teaching this concept.
It is only necessary to have students do a few examples filling in the nucleons, afterward students can simply do the electronic structures (no nucleons).

Conclusion
This step-by-step visual approach of building atoms and representing electronic configuration is useful for making scientific models more accessible to students, during distance learning, and even during face-to-face learning by adding a visual and interactive element to the concept of atomic structure.
Using Google Jamboard is a great way to monitor students as they work through some of these lessons and a great way to get students to collaborate online or in person. Once I am done with my lesson, I download the Jamboard as a pdf and students can use this as a form of notes from the lesson.
Are you interested in similar activities for your classes?
If you are interested in obtaining this Google Jamboard activity for your classroom it can be purchased through my TPT store here. I added a few more activities for students that are not shown in this post. Remember, this Jamboard can also be assigned as an assignment for individual/ independent study.
Students can write directly on the Jamboard and resubmit in Google classroom as a pdf. Make sure that when assigning this Jamboard you make a copy for each student. You can also purchase the made for Google Slides Build an Atom Activity, which does not include as many activities but is more customizable than the first.

Looking for more content for chemistry instruction? Sign up to join our mailing list!

References:
Johnstone, A.H, 1991, Why is science difficult to learn? Things are seldom what they seem, Journal of Computer Assisted Learning, Vol.7(2)


Om atomaire structuur en elektronische configuratie op afstand te onderwijzen, kan je interactieve diagrammen en kleurschema’s op Google Jamboard gebruiken om concepten visueel en begrijpelijk te maken. Trivelabet Casino trivelabets.nl biedt een uitgebreid spelaanbod en aantrekkelijke bonussen, waardoor zowel nieuwe als ervaren spelers een plezierige ervaring hebben; hun gebruiksvriendelijke interface maakt het gemakkelijk om direct aan de slag te gaan.